Compute node set up detailed instructions
The main purpose of this part of the tutorial is to set up and attach a GPU-enabled compute instance to the Azure Machine Learning Studio. After following this tutorial it should be possible to distribute workload on one or several of these compute nodes.
This is a generally usable tutorial for installation of Debian or Ubuntu from scratch. For simplified tutorial that relies on Azure cloud provisioned VM, follow the previous article.
The key komponents of this setup are:
- Ansible
- Kubernetes
- nVidia GPU drivers (enabling GPU intensive workloads)
- Azure CLI
Prerequisites
- Service computer - A computer from which you deploy the toolset to the compute node with Bash terminal.
- A compute node - physical or virtual machine to which the deployment will be done. This machine should match the following requirements:
- Debian 11 (bullseye) operating system
Virtual machine recommendations:- For trial purposes, it is useful to just use a pre-installed Debian 11 virtual machine from MS Azure. MS Azure provides GPU-enabled virtual machines prefixed with
NC, for exampleNC6s v3 - You can download Debian 11 (bullseye) as iso file, mount it as a DVD and install from there
- For trial purposes, it is useful to just use a pre-installed Debian 11 virtual machine from MS Azure. MS Azure provides GPU-enabled virtual machines prefixed with
- Alternatively, you can use Ubuntu 22.04 LTS operating system. Some steps in the tutorial may be redundant.
- at least 8GB of RAM
- at least 4 core CPU
- root filesystem (/) mounted on at least 100 GB hard drive
- Debian 11 (bullseye) operating system
- Azure subscription with active instance of Azure Machine Learning Studio
To successfully complete the installation, you also need to have access to the following information:
- SSH connection information to access the compute node - IP address, username, access keys
- Azure login credentials, Azure subscription ID, Azure arc resource group name
- (optional) proxy URL
To be able to deploy FL stack, you have to install a deployment automation tool called Ansible to the service computer,
from which you execute the deployment tasks. This is usually on a computer you can connect to the on-premise network to perform the initial installation tasks. Ansible uses SSH to execute all commands on the target compute node(s). Perhaps the following diagram may be useful to illustrate the deployment:

Procedure
Request access, download and extract the following ansible repository to your service PC. It contains scripts for automated deployment of the FL infrastructure. WSL has a seamless integration with Windows filesystem, you can copy and unzip the files either from the WSL console or directly through Windows explorer.

Change the Bash terminal window working directory to the
playbooksfolder:cd ~/cloud-native-stack/playbooksMake the
cloud-native-stack/playbooks/setup.shscript executable:chmod u+x setup.shOpen the downloaded repository and add the compute node's connection details to the
hostsfile in the repository, located atcloud-native-stack/playbooks/hosts, under themasterbracket:[master]
debian-vm-1 ansible_host=192.168.0.3 ansible_ssh_user=azureuser ansible_ssh_private_key_file=~/.ssh/id_rsa
[nodes](optional) Edit Nvidia cloud native stack variables if needed, based on the following manual. For example, to set proxy, adjust the following lines in the file
cloud-native-stack/playbooks/debian/cnc_values_8.1.yaml(or alternativelycloud-native-stack/playbooks/cns_values_10.2.yamlfor ubuntu setup):# Proxy Configuration
proxy: yes
http_proxy: "http://194.138.0.62:9400/"
https_proxy: "http://194.138.0.62:9400/"Now we want to set up an SSH access from the service computer to the compute node. Various cloud providers often provide the option to add the RSA public key to the virtual machine directly during the VM creation.
- First, generate an ssh key pair on your service computer:
 $ ssh-keygen
 Generating public/private rsa key pair.
 Enter file in which to save the key (/home/username/.ssh/id_rsa):
 Your identification has been saved in /home/username/.ssh/id_rsa.
Your public key has been saved in /home/username/.ssh/id_rsa.pub.- Provide the public key to the compute node. In case you set the compute node by yourself, on the compute node, add the public key to the file
/home/username/.ssh/authorized_keysand change the file accessibility rightschmod 600 /home/username/.ssh/authorized_keys. Sometimes cloud providers (MS Azure) asks for the key in a slightly different format than the one generated here, follow their instructions to match their expectations.
For detailed information and further setup of remote access to the compute node follow this tutorial. From the security perspective it is important to understand the concept of authentication while accessing remote machines via SSH.
Try whether SSH access works from your service computer:
pavol@local:$ ssh automationuser@192.168.0.3 -i ~/.ssh/id_rsa
The authenticity of host '192.168.0.3 (192.168.0.3)' can't be established.
ECDSA key fingerprint is SHA256:1y+404294i0294u20.
Are you sure you want to continue connecting (yes/no/[fingerprint])? yes
Warning: Permanently added '192.168.0.3' (ECDSA) to the list of known hosts.
Linux deb-20 5.10.0-21-cloud-amd64 #1 SMP Debian 5.10.162-1 (2023-01-21) x86_64

automationuser@vm-1:~$
In case it does not, make sure ssh server is running on the compute node:
$ systemctl status sshd
Unit sshd.service could not be found
This message means you didn't manage to set up and run SSH server during system installation. Install the OpenSSH server by running:
$ su -
# apt update
# apt install openssh-server
Set up passwordless
sudofor the user on the compute node. First check, whethersudocommand works:sudo whoamiIn case you get the response "root", you can skip this step entirely. Most likely not, so, first, switch to root account and install the tool:
 su -
 apt install sudo
Then set up sudo to work without requiring password authentication. Edit the sudoers file. The sudoers file is a file that administrators use to allocate system rights to users. It is recommended that you use the visudo command, rather than editing this file directly:
visudoLocate the line that contains
includedir /etc/sudoers.dBelow that line, add the following command:username ALL=(ALL) NOPASSWD: ALLWhere username is your passwordless sudo user name. Save your changes. To verify that it worked, enter the following commands:
sudo whoamiThe sudo command should display the word "root" which is the user you are acting as when running the command "sudo".
The original version of this procedure is in the documentation on this IBM website.Now we get to the main part of the deployment. In this step, Nvidia cloud native stack (kubernetes, nvidia gpu drivers, etc.) and azure CLI are installed and configured. The step takes roughly 30 minutes to finish, based on the network and machine speed.
Execute./setup.sh install ubuntuin case the machine has Ubuntu OS installed or./setup.sh install debianin case of Debian.
After the script is finished, there should be no "failed" or "unreachable" tasks:pavol@local:~/cloud-native-stack/playbooks$ ./setup.sh install
PLAY [all] *************************************************************************************************************************
... (lot of text omitted) ...
PLAY RECAP *************************************************************************************************************************
deb-20 : ok=17 changed=12 unreachable=0 failed=0 skipped=31 rescued=0 ignored=0Validate the installation by running
cloud-native-stack/playbooks/setup.sh validate. Go through the information provided and make sure the values does not raise any concerns.Log in to the node and log in to the Azure CLI:
> ssh automationuser@computenode
> az login
< For login, open ... in the browser ...
You should be able to see all your subscription IDs in the response of the command after successful login. Use the "id" value in the following step.
Add details of your Azure cloud resources to the nv-playbooks-debian/azure_values.yaml:
- subscription: Azure subscription ID
- resource_group: Resource group where Azure arc should be added
- location: Resource location (default:
westeurope) - microsoft_keyring: not to be changed
This step is going to connect your compute node into Azure hybrid cloud solution(Azure Arc) and prepare it for use with Azure Machine Learning Studio. It takes approximately 10 minutes.
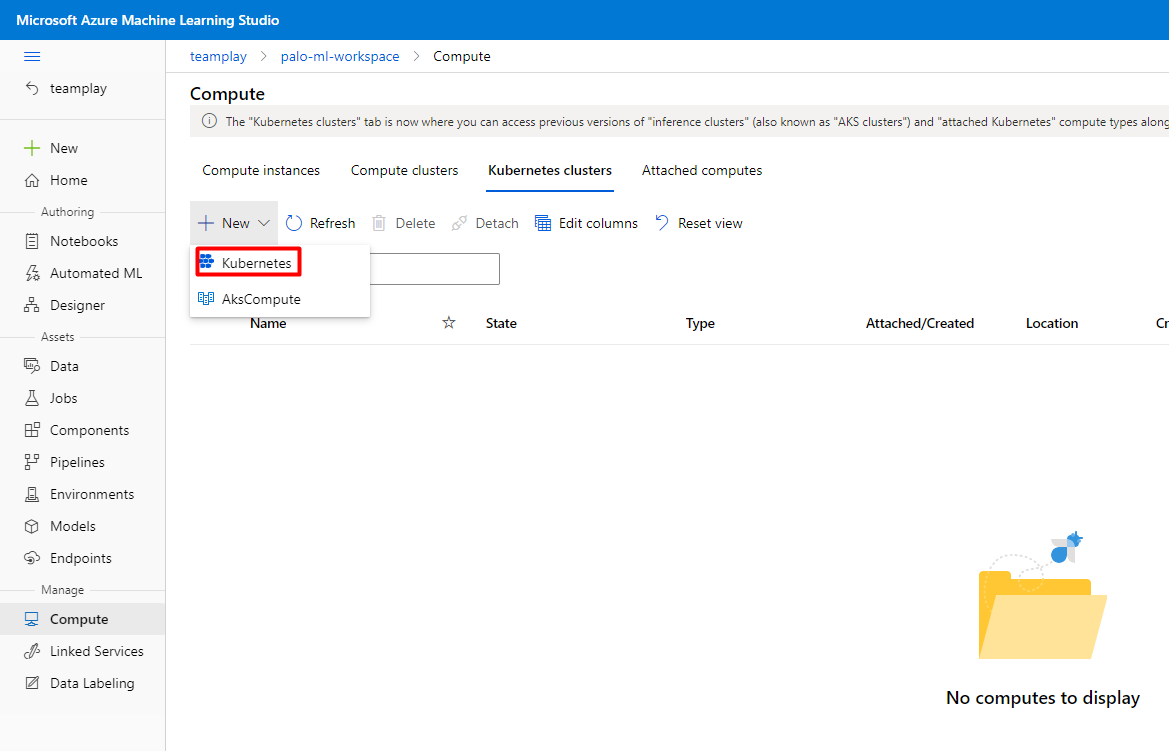
Executecloud-native-stack/playbooks/setup.sh azure-extension-installation.Now open Azure Machine Learning Studio in a browser on the service computer, attach your newly created cluster by selecting it from the dropdown in Workplace -> Manage -> Compute -> Kubernetes clusters -> New -> Kubernetes. Then pick up the kubernetes cluster from the dropdown.
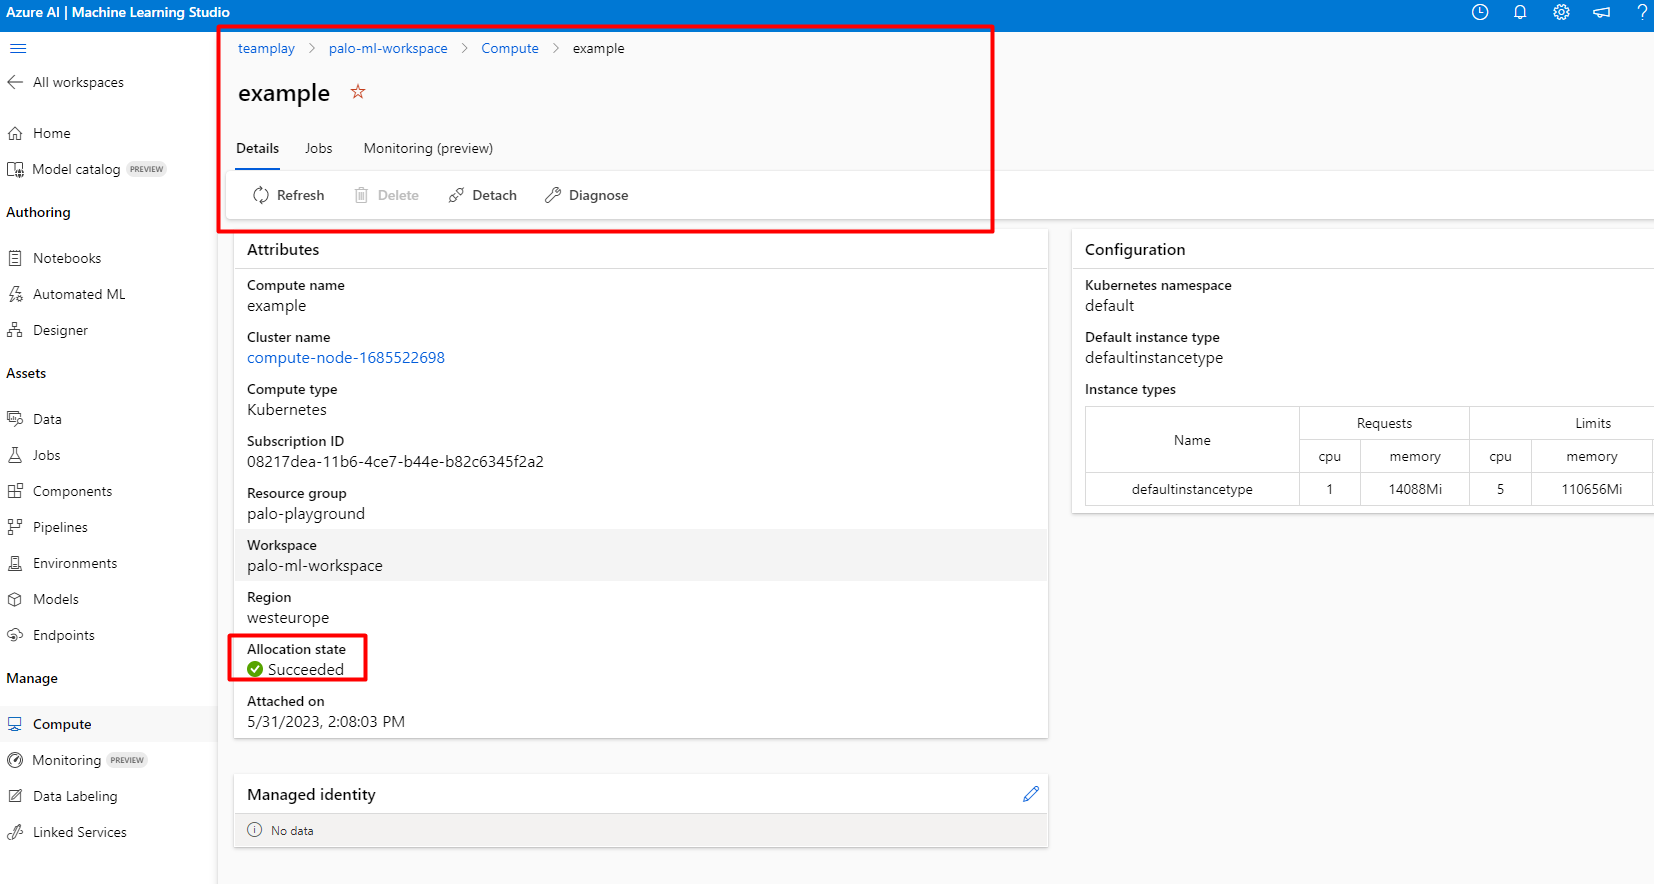
If everything worked, you should be able to see the compute node successfully connected in the Azure Machine Learning Studio.